A modelers tale by: Orrie Walls
This story starts you off in XSI were you base model should be done and your model should look ready to taking into a mudding program like Zbrush or Mudbox.
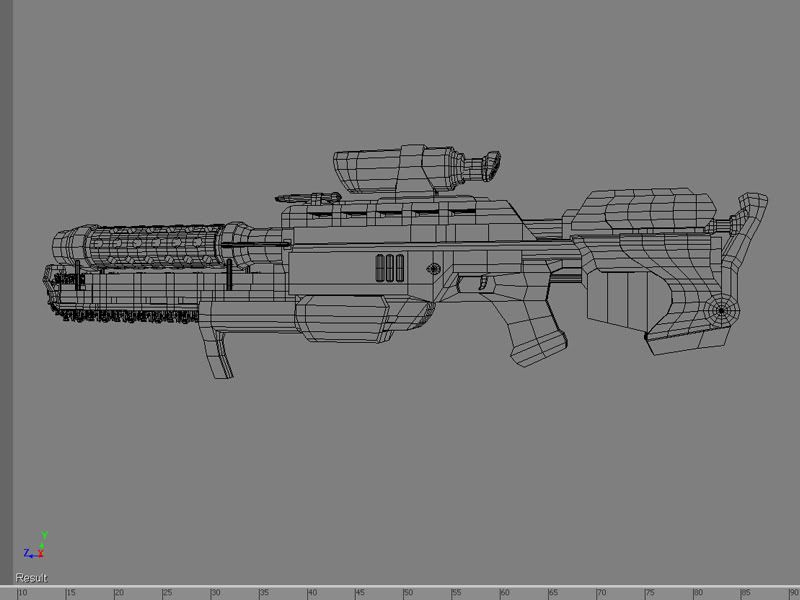
I'll be using this tutorial to show how I am creating my details in Zbrush for the compotition held by Digimill Student Forums. If I have time I will also show how I would approach the same idea in Mudbox.
At the start of our journy we will need to pack everything needed to go to Zbrush. First we must test that out model or part of our model is able to take subdivisions without loosing the quality of the shape he first had in mind. I'm going to just focuse on one peice of my gun other wise this tutorial would be too long and I would bore you all to tears.
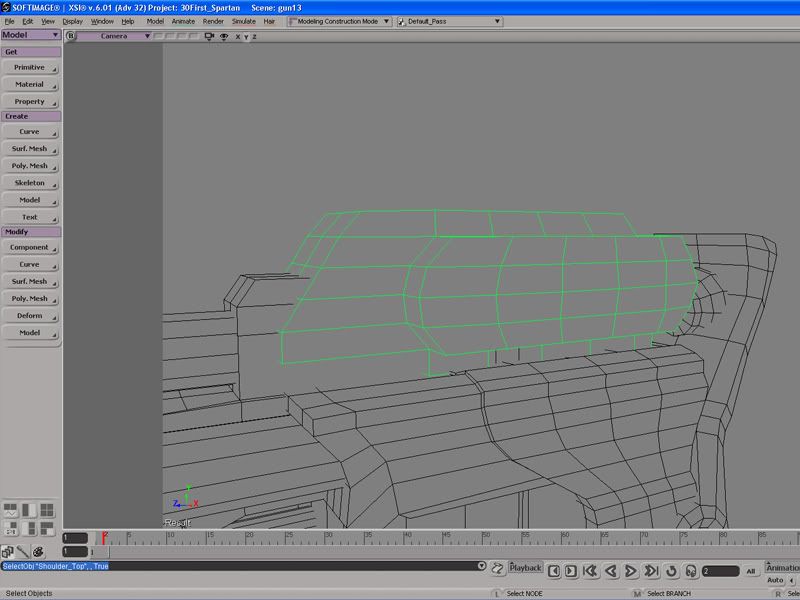
Ok so as you can see the original has nice hard edges and lines but when I subdivided it with either hitting + on the number pad or U > Ctrl+A > Right Click > Local Subdivision Refinment it gets all smooth and orgainic looking. Now you may want that for some parts but not all of it. So what I do is bevel the edges that I want to remain harder so that when I try subdi-ing it it holds its shape better like this:
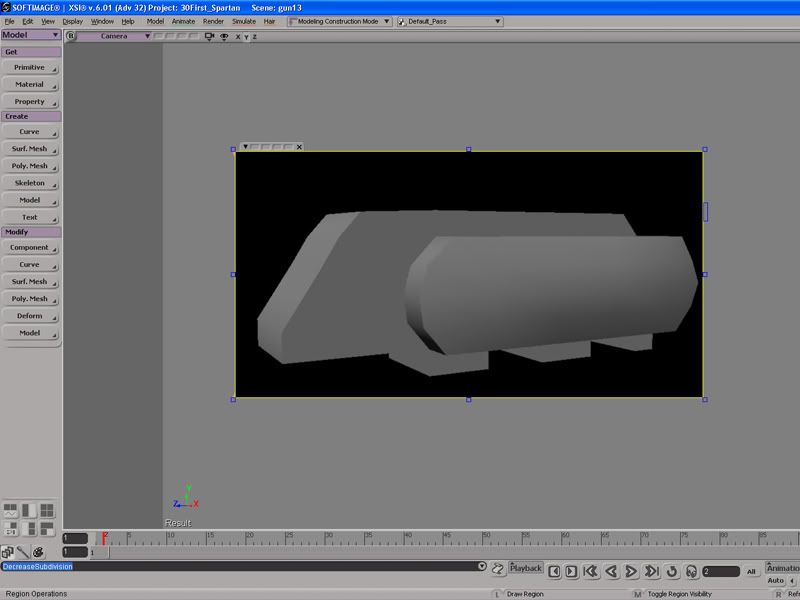
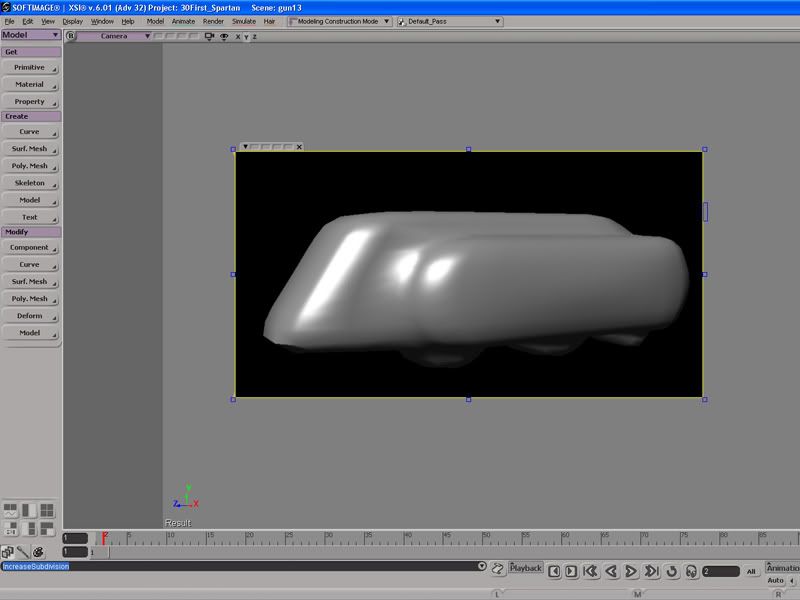
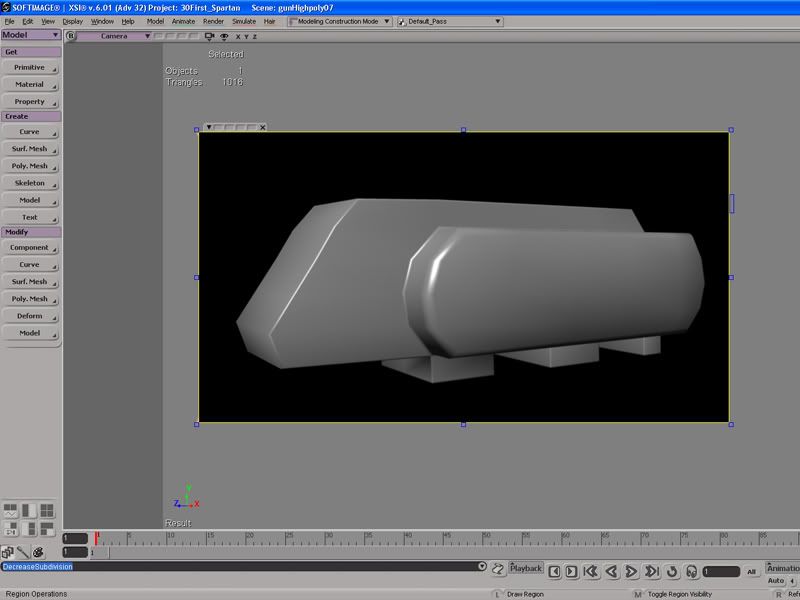
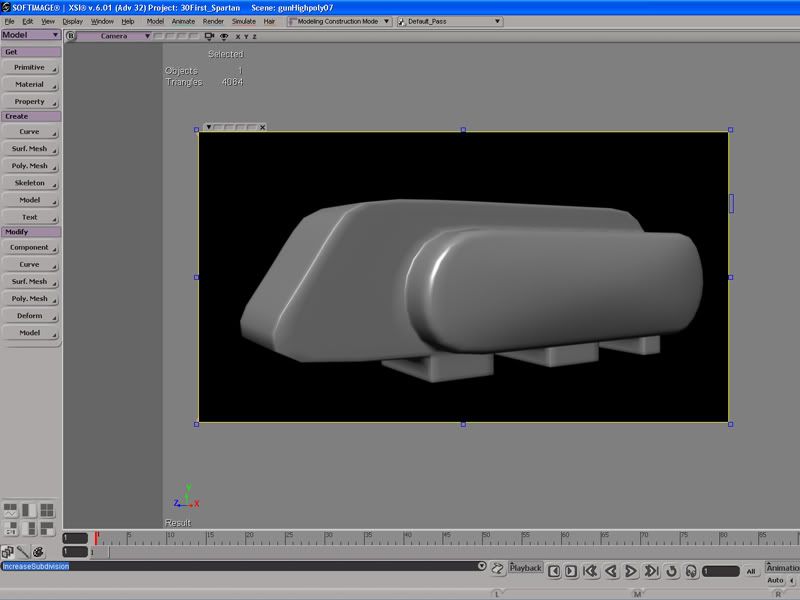
Now you maybe wondering while I bother doing. For those of you that have not used Zbrush or Mudbox alot when you up your subdivision levels the program make it smoother like subdi-ing in XSI and while you can move points in both programs to reduce the smoothness look its alot quicker to do so in XSI first.
Now that you got your model where you want it with the edges you wanting to be hard with the help of bevels it time to make sure you are all quads or quads and triangles cause neither Zbrush or Mudbox will import an OBJ with 5+ sided polygons and some times you will get 5 sides when you finished beveling the edges you want. To check for 5 sides go Select > Select n-Sided Polygons > Five Side or More... I like to detach the menu so that I can click on it as much as I want while I am fixing my five sides and triangles were needed.
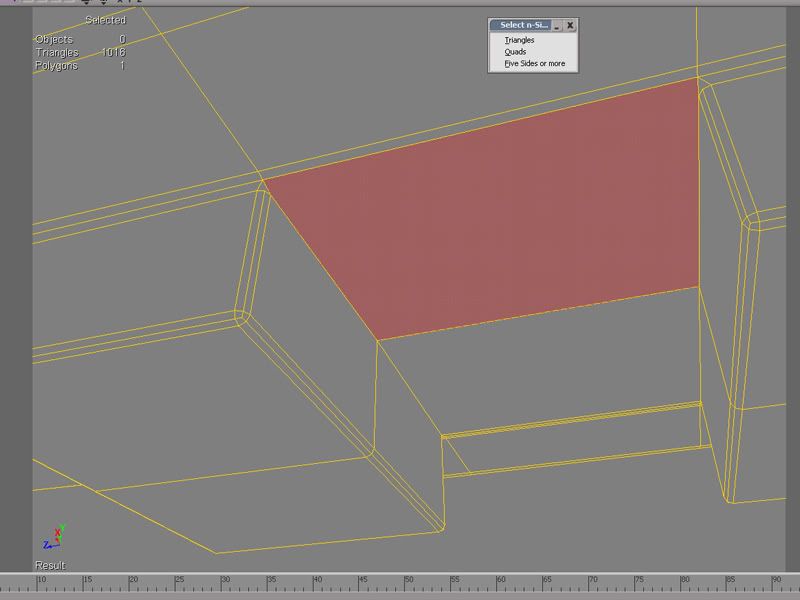
As you can see I've got a nasty 5 side on the bottom of this piece, probably cause I either didn't select that an edgle loop or when beveling I forgot to check Uniform Mitering which helps keep quads. Note: I said helps, there are times were beveling will still create 5+ sided polygons even when it is selected.
Ok so once you are finished fixing your edge loops so that its all quads with a few triangles if needed its time to unwrap your model or in my cause for this tut, a peice of my model.
Select your model and make sure you are in Render Mode (3) and go Get > Materail > Phong, this will make it so that the model or the piece of model is not shareing the same materail with any other object in your scene.
The next step is to quickly open up photoshop and go File > New Document size: 512x512 and fill it in with black. Save it out as a JPG in your pictures folder cause we will use if for unwrapping.
Back in XSI select your object and go Get > Texture > Image and select the black JPG you just made. Then set up your texture perjection that will best suit the shape of your object. For mine because I have so many shapes I just selected Planar YZ. Now lests make our screen easier for editing our unwrap. Right Click on the square within a square shape by the view manager (ex:hiddenline, wireframe, texture, etc) and click Horizontal for your Camera view. Open up the Texture Editor in your Front view and do the same thing so that your screen looks something like this:
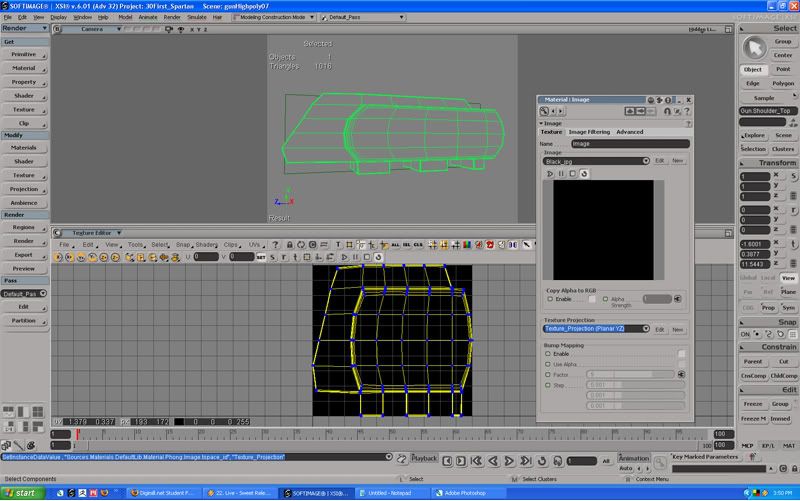
If you cant see your texture projecton just hit the refresh button and it should appear. Now lets make sure we can see were things are overlapping. Go View > Show Overlaps in the Texture Editor. Now I can quite tell you how you should unwrap your object because each object is different but in the end you should have no overlappingedges and all faces should be visable your unwrapped piece should look something like this:
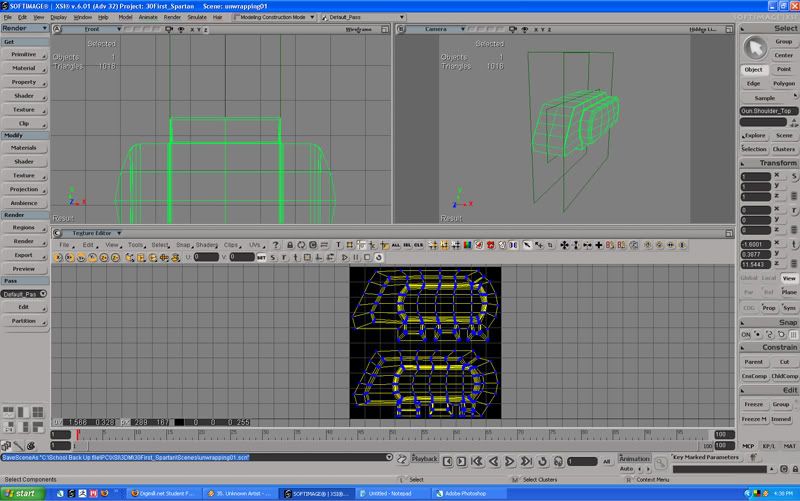
Once your done you should probably have freezed your mesh delete the texture projection lines and save. Next we export out now unwrapped object as an OBJ by going File > Export > OBJ File... Now I usually save it in my model folder but I know others that like to make a new folder and save their OBJs in there. Once your OBJ is saved head over into Zbrush or Mudbox and it is time to start mudding.
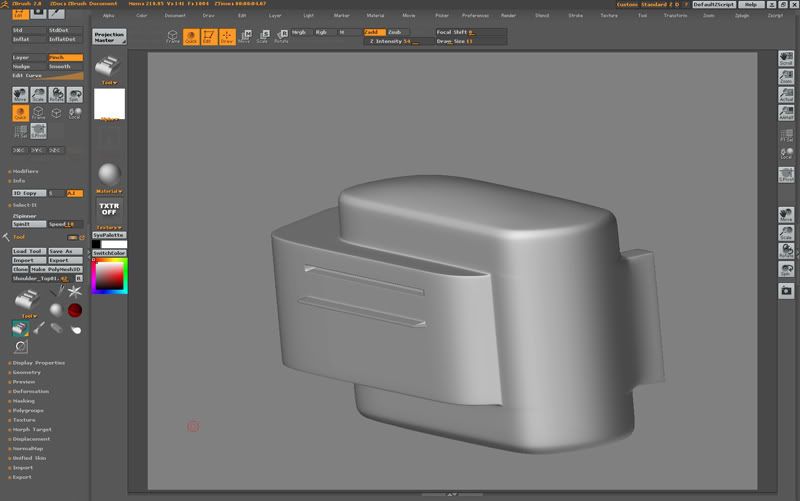
So once in Zbrush go Document > Double to make your canvas bigger. Then go to Tool and Transforum drop down menues and add them to your pallet by clicking on the little circle with an arrow in it in the top left corner. Now to imoport your OBJ select Tool > Import > (OBJs name) and grab your OBJ from were you saved it, drag it onto your canvas and press "T" on your keyboard so that you can edit your object. Your screen should look something like this:
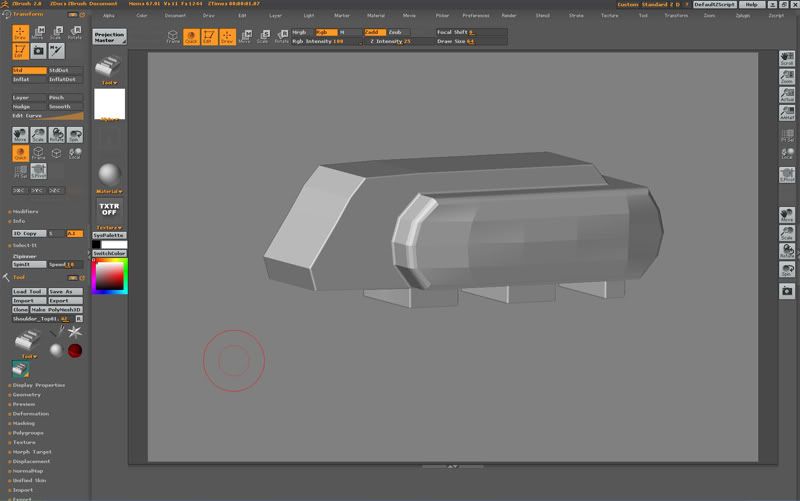
Ok so lets give our object some subdivisions. In your tools under Geomety there is a large button called Divide (Ctrl+D), click it like 6 times. Depending on how many polygons you had going it you should now be anywere between 40,000 - Million+ Polys which is probably more then enough for your current object.
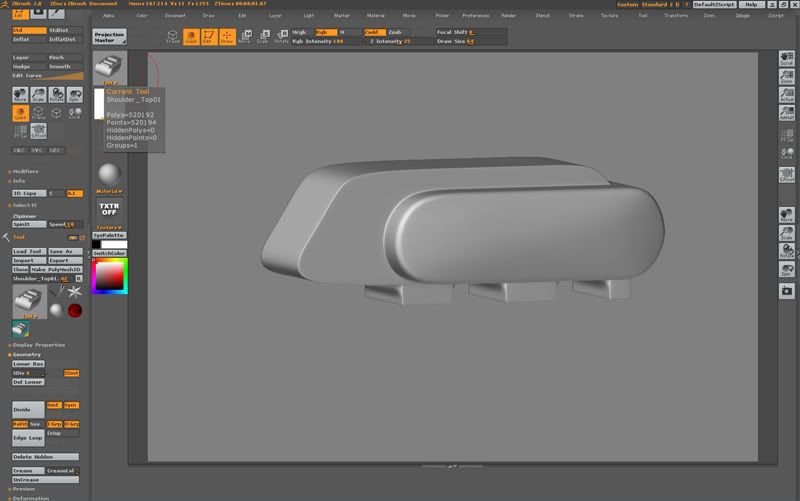
You will notice that the harder beveled edges remained because we took the time to make them hard. Look at what it looks like if I didn't do this.
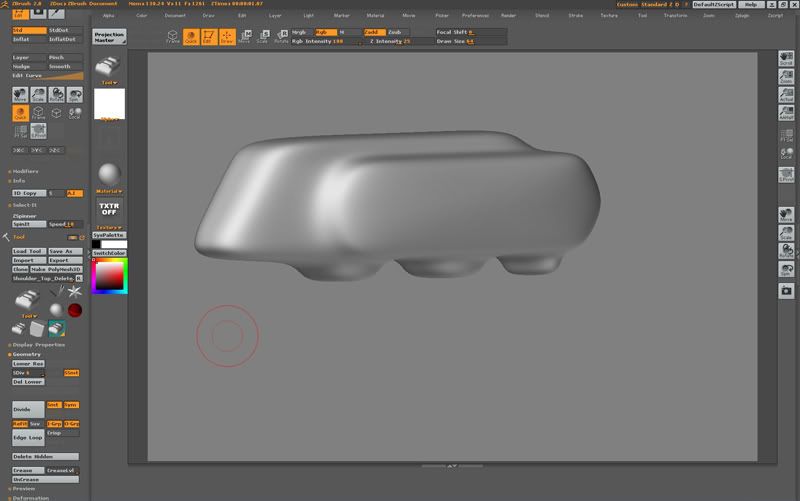
Defently too soft and organic and not what I want my object to look like when I'm adding more detail and hard edges. Note: To go between the lower hand higher levels of subdivisions you can either click on the buttons in the Geometry pallet: Lower Res, Higher Res or Shift+D and D will do the same.
I'm not just going to show you some way to make hard edges, scratches, grung marks and other thingsthat you may want to try with your object.
I'm a huge fan of using a Tablet for any mudding so if you have one I suggest that you use it for you will find that you will have more control then with a mouse.
Moving on snap to a view by holding shift while rotating around your object. Choose your brush size with either the sider or the "[" "]" keys and set your ZIntensity to the the amount you need. Zoom in closer to were you want to start creating a crease in your Object. While holding Ctrl draw in your crease. Dont forget to press "X" to duplicate your crease line if it is the same on the other side.
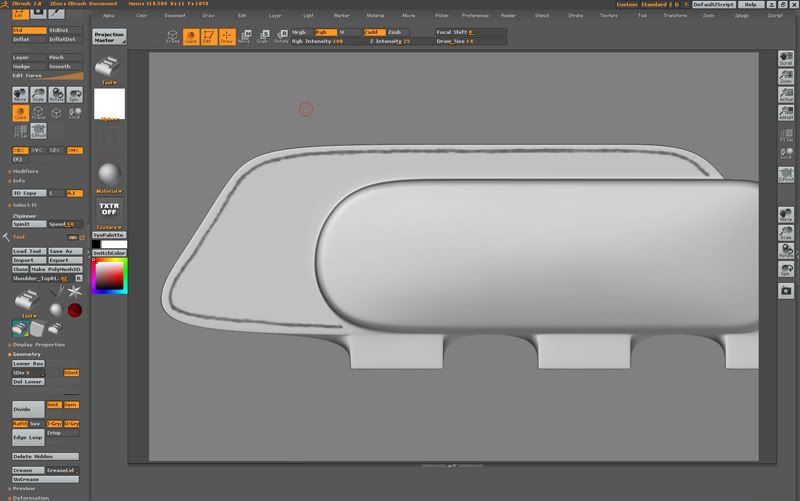
Ctrl + Click to invert the mask so it looks like this.
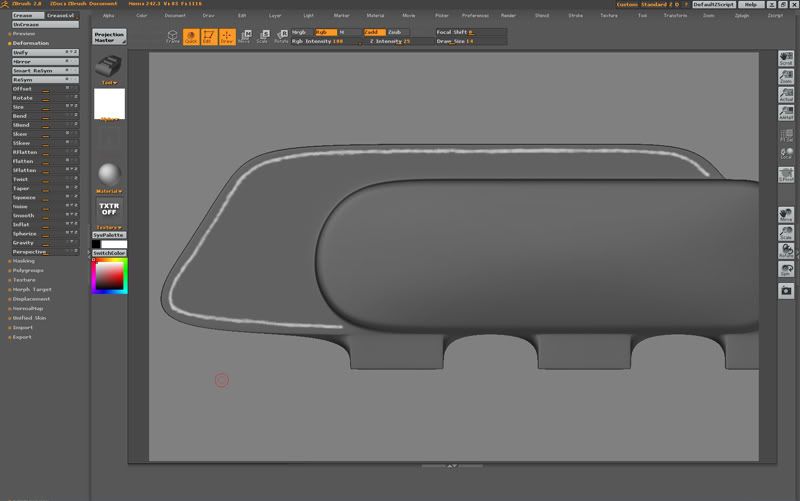
Open your Deformation Pallet under Tool and apply a negative value to inflat by either typing it in or pulling on the slider. I did -26 to make a shallow crease. Then drag the Smooth slider to 100 about 10 times, this will get rid of alot of the jegginess in the crease.
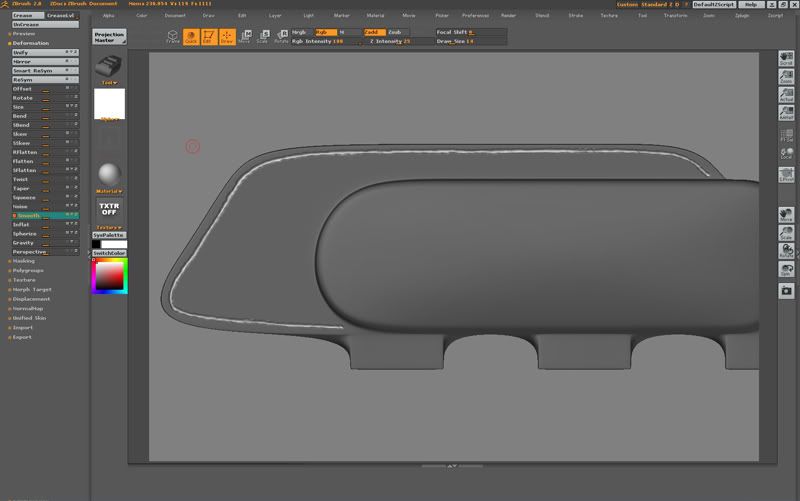
The jegginess with not go away because the mask is blocking the smooth from effecting the rest of the crease. Hold Ctrl+Click on the canvas and drag out to make a small selection box, dont select anything and release. the mask will be turned off. Now in your Transform pallet select the smooth brush or hold shift with your current brush and smooth the sides of your crease. It should looks someting like this when it is done.
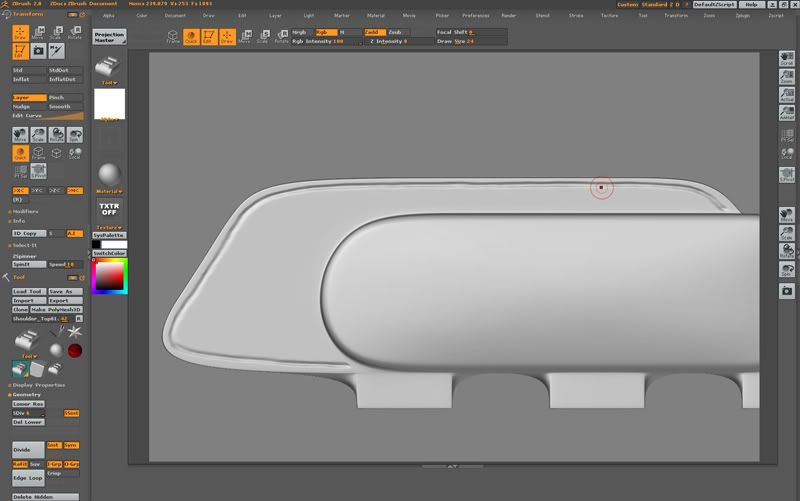
Now select the pinch brush. Ok so you can either do two things. You can pinch each side and create a hard edge all away around or you can pinch together the crease. Here is an example of both:
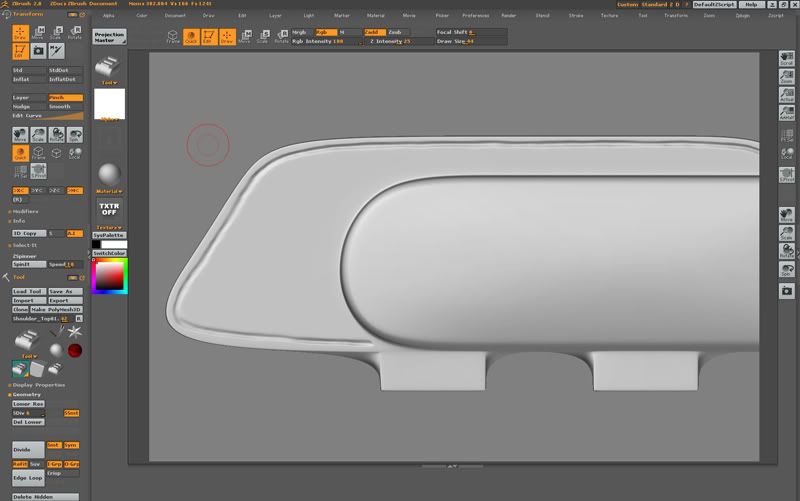
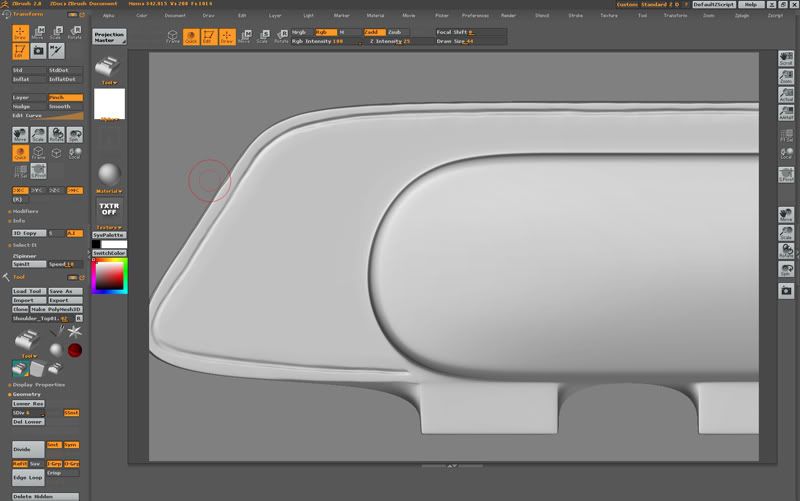
Ok so thats creating hard edges and creases with masks, now on to Alpha Brushes.
Ok so go into photoshop and make a new document 512x512. Fill it in with black. Now take a hard brush and hold shift while drawing a stroke from one side to the other. You should have someting like this or you can use this.

Save it as a BMP 24bit+ depending on the amount of detail you have, we dont have much detail so just save it as 24bit. Save in your Projects Pictures folder in a new folder called Alpha's.
Go back to Zbrush, move your object into the snapped view were you want to have a strieght crease line. Then click the big button named Projection Master. Inside projection master turn off Colors and turn on Double sided if you want the same thing on side, also tern on Deformation and Normalized. Once finished presh Drop Now.
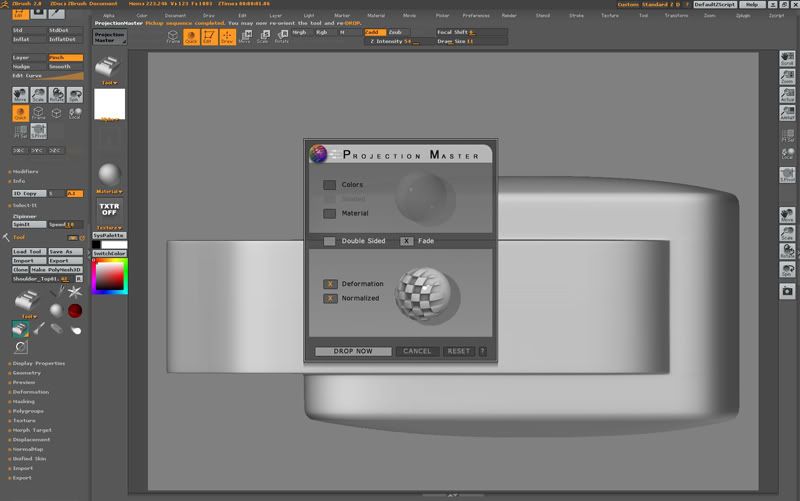
Under the Brush Pucture select ALpha and import your image you just made in PhotoShop. Next change your Stroke to DragDot. Now when you hold down your mouse or tablet you should see your alpha brush if you presh you will notice that it bumps out, well not on this brush but on other Alpha brushes you will. Note: If you hold Alt or press the Zsub button by the ZIntensity the image will embed. Now your brush might be to intense, play around with the intensity until you get the desired effect.
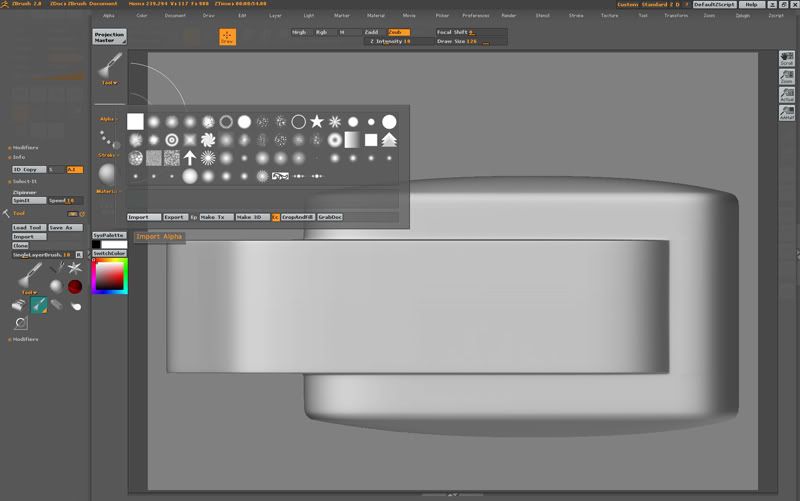
Once your done placing your line around go back to the Projection Master button and click it, then click PickUp Now. You will now notic that Zadd pulls out and Zsub pushes in, but better yet you can see how nicely they make hard edges and creases as long as they are fallowing the flow of the edge loops of your object and if there is enough subdivisions to hold the effect of the alpha on the object.
There are a number of ways you can create scratches from hand scultping them, to painting them in Projection Master, to using Alpha brushes like the example above. Grung/sscuff marks and such I do with alpha brushes. To learn more on how to make alpha brushes visit My Website and you'll find it in the Tutorial/Download section.
Anyways here something I finished with some of the techniques I spoke about above:
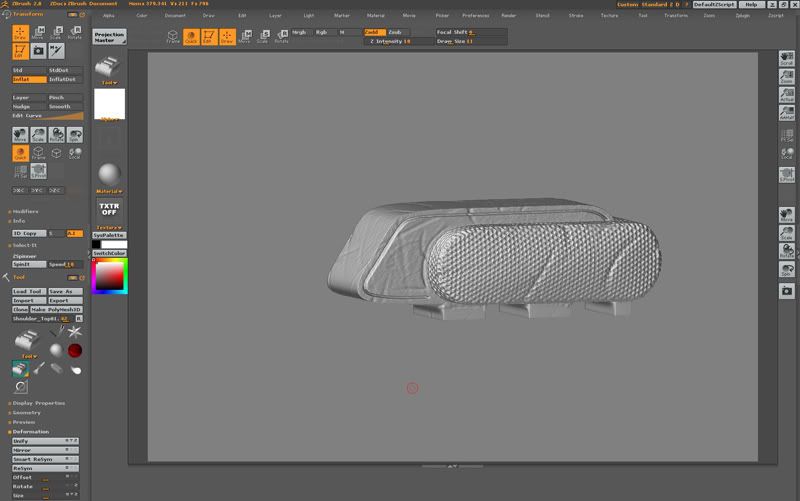
Note: Dont forget to save while working. Save you work as Ztools in your model folder. Under tool just go Save As to save your current tool. Hint, if you lower your subdivision levels before saving your save file will be smaller and still have all the detail you put it it. Do not export, exporting will not keep all your subdivisions but rather the current subdivision layer you are on.
Ok so we are finished with the model, you like the looks of it and its now time to move onto another piece so lets export a Normal Map and get it back into XSI.
First things first, lets hit Shift+D a bunch until we get to the base model, you may notice like mine that it looks different from when you imported it, this is normal. What we need to do is export this new base model and check the texture projections to see if they are working.
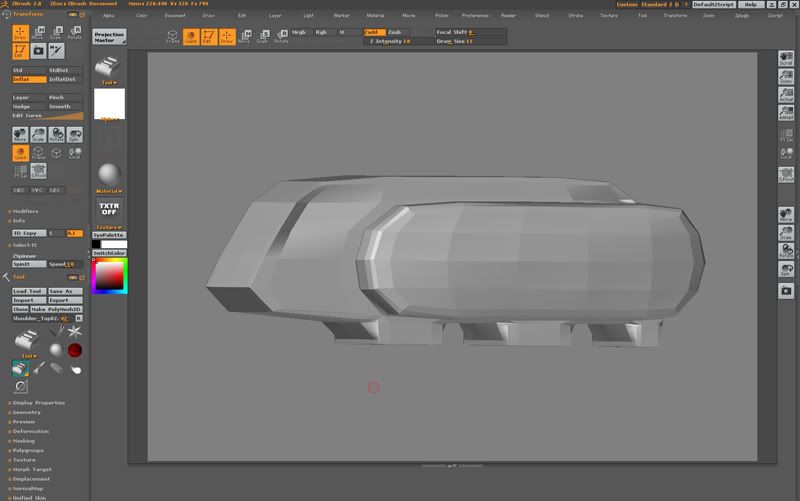
Ok to check the texture projections go Tool > Texture > Uv Check. If you got any read showing you have some overlapping happening and you got to take this OBJ and fix it. To export the current OBJ you just click tool pallet and export the OBJ to your models folder. Make sure you are on Subdi 1 before exporting this will make fixing the texture projection in XSI easier.
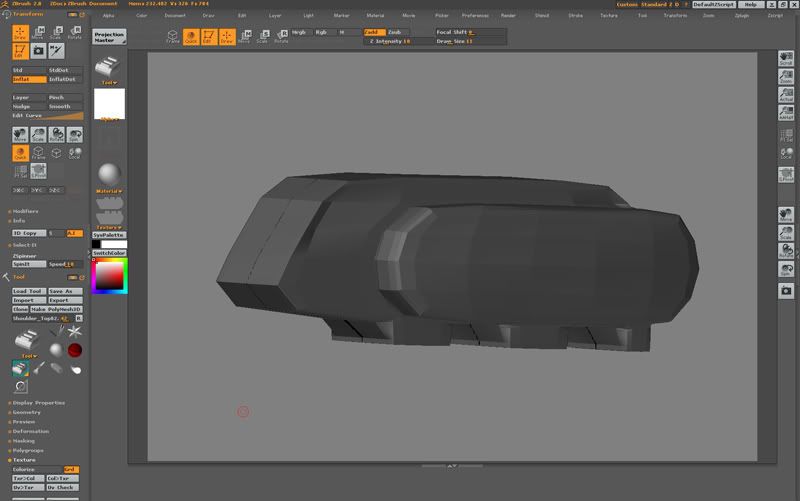
Ok so say you had some read show up when you checked your Uvs, well back in XSI open a new scene and import you OBJ that you just exported, File > Import > OBJ File... Then hit Ctrl+7 and fix the over lapping edge loops then export the now fixed OBJ. Hop back into Zbrush and under tools go Tools > Import > Import and import your fixed OBJ and recheck your Uv's until you have no more red showing.
Ok so everything is working and there is no red showing up, in the texture pannel turn off the texture so its no longer visible. The next step is to make sure you have the Zplugin > ZMapper, ZPlugins should be in the top right corner in Zbrush. If you dont have it Click Here to download the plugin from Pixologic, there should be instructions on how to install the plugin in. If not post it in the Help section and I'll tell you how ASAP.
This journy is almost finished! Ok so click on ZMapper, your sceen should look something like this:
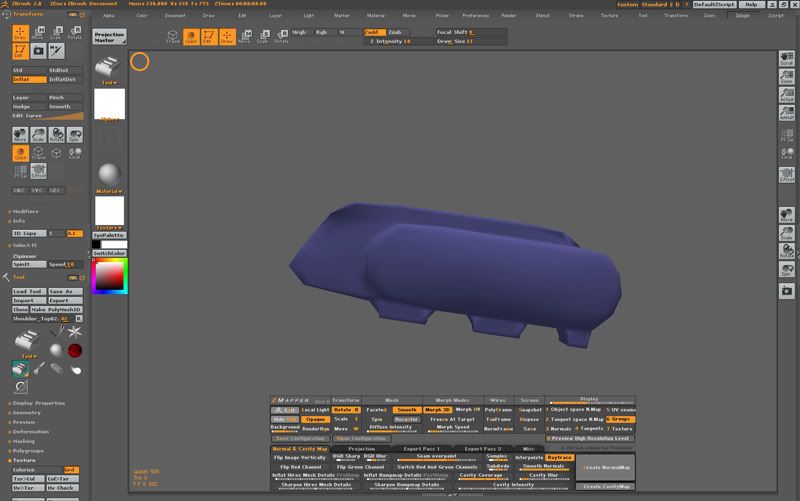
You can turn of the Spin by clicking on the spin button if you want. Open up the Normal & Cavity Map tab at the bottom. Here were you create your Normal map. I like to use these settings when I create a normal map:
- Seam overpaint: Just over half
- Samples: All 4
- Subdivde: 3-4 depending on the amount of detail.
- Smooth Normals: Max
- Create Normal Map
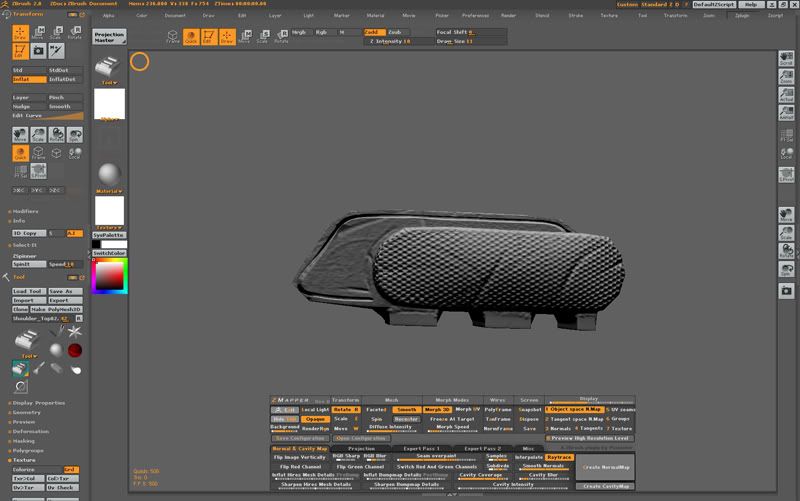
Alright! Its finished rendering the Normal map... now what? Ok so once its finished just click on the canvas and your normal map will be in the texture pallet. Go Texture > Export and export your texture as an PSD with the naming convention "object name_normal.psd" into your picture folder.
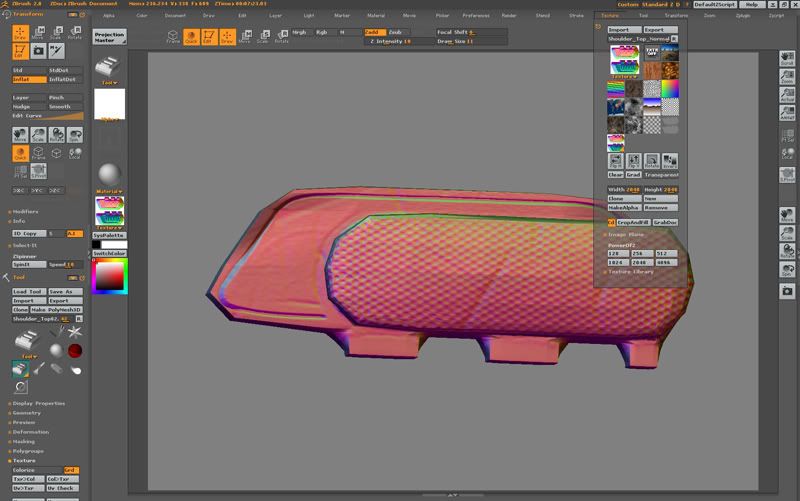
Ok go to photoshop and open the new image document copy the image and past it in the scene again, hit Ctrl+T and flip it Vertically because Zbrush likes to flip your textures, now save the image as a Targa 32Bit with the naming convention of "oject name_normal.tga".
Head over to XSI and open up the scene with your proberly unwrapped model (obj) in it. Hit 7 on your key board to open up the Render Tree. Then go Nodes > Bump > Normal Map and connect the noraml map node to the Materials Bump Map.
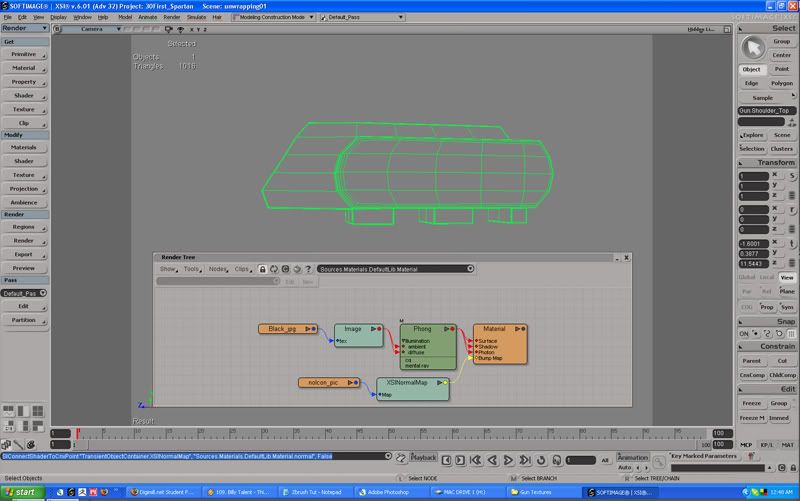
Now if you render you will probably not see it, that is cause you have told XSI to reconize normals yet on that object and you need to change your View Port from what ever you are (ex: Hiddenline) to Realtime Shaders > Open GL.
Then go to Render > Get > Property > Ultimapper and close your ultimapper I'll go into detail what the ultimapper does some other day but thats a different tut. You should now be able to render your object and see your displacement via normal maping.
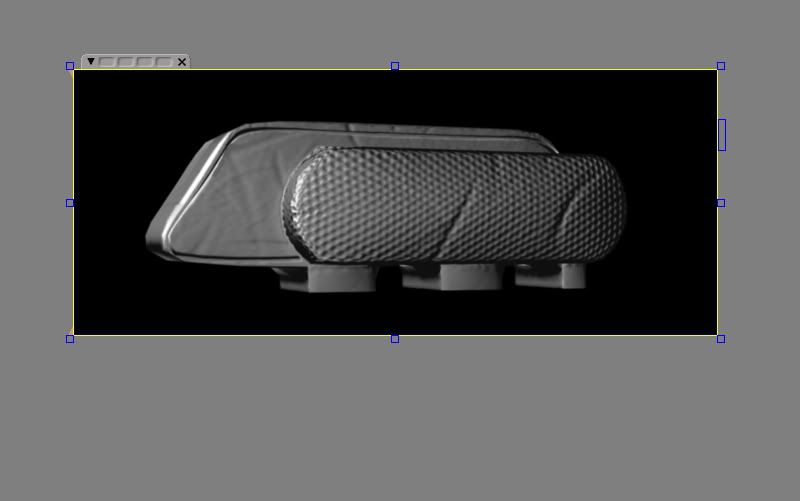
And this story comes to an end.



No comments:
Post a Comment